Q & A - Correct Way to Nail a Ridge Cap

Learn how to nail a ridge cap correctly.
When installing the ridge cap shingles they should be nailed with at least two nails per shingle and use a nail long enough to go through the sheathing or into it 3/4 of an inch, then the next ridge cap is laid over the top of those nails.
Repeating this process across the ridge will give you what is called a blind nailed ridge. The nails are basically unseen. The last ridge cap on the end or in the middle of the roof is then nailed with four nails and this is sometimes called face nailed. It must be done to fasten the shingle down.
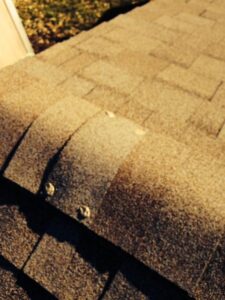
Dave, the picture you sent me shows the use of a low profile ridge cap and the four nails placed in the 4 corners of the ridge cap. This is good to do on the last piece of the ridge. I prefer using asphalt mastic but with the lighter color shingle, this roofer chose to use clear silicone. It will be fine. Don’t worry about the nails, as they need to be there.
Ridge caps have a risk of being blown off because of the suction caused by wind blowing over the ridge. Having proper length nails and covering each ridge cap, then masticating those uncovered nails is a good practice to have.
Have a question? AskARoofer.
Find your local roofing contractor in the RoofersCoffeeShop® Contractor Directory.
Recommended For You

Q&A – Insulation on Rafters
Read More ...
Q & A - Correct Way to Nail a Ridge Cap
Read More ...
Q & A - Flat Roof Coatings
Read More ...")
")
")


Comments
Leave a Reply
Have an account? Login to leave a comment!
Sign In