How to maximize curb appeal with a color visualizer

By DaVinci Roofscapes.
Color visualizers are a great, easy-to-use software to play with different roofing, siding and paint options to ensure you love your exterior makeover.
When you give your home an exterior makeover there are so many decisions to make. DaVinci Roofscapes makes the process easier with their online Color Visualizer. This free easy-to-use software lets homeowners play with different options for roofing, siding and paint colors. Upload a photo of your home and see how it will look with a whole new color scheme.
August is National Curb Appeal Month, when homeowners look to boost their home’s curb appeal before the busy Fall season. With the Color Visualizer, you can experiment with a few upgrades, or see how your home would look with a complete exterior renovation.
Read on to learn all about how the Color Visualizer works, with some great examples of exterior styles and expert tips on how to get the most out of this fun, free and easy online software.
Why use a color visualizer?
The Color Visualizer provides an opportunity to see how your home might look in a variety of materials and finishes. This software includes roofing products from DaVinci Roofscapes, siding and trim from Westlake Royal Building Products, and paint colors from Benjamin Moore and Sherwin-Williams.
The software also includes pre-selected color palettes; these are a big help, offering popular combinations of exterior colors for inspiration. With so many options to choose from, you can create several custom looks for your home, then save and compare them to see which colors work best.
How does the color visualizer work?
You’ll begin by choosing a photo; you can use an image from the Color Visualizer that resembles the style of your home or upload your own photo.
1 - Choose a photo
When you open the Color Visualizer, you’ll see a gallery of home images to choose from. Just click on the one you like, and the software will open the product selection page. If you want to use your own image, click “Upload Your Home” and follow the directions.

After choosing a photo, it’s smart to name your project so you can identify it and save it for later. To do this, click on “My New Project” on the upper left, and name the photo. You can come back later to add more details.
2 - Select your products
To begin choosing your products, click the word “Products” on the left. This opens the product selection page where you’ll see a list of options: Roofing, Walls, Accent Walls and Trim. Clicking each one will display the available materials and colors.
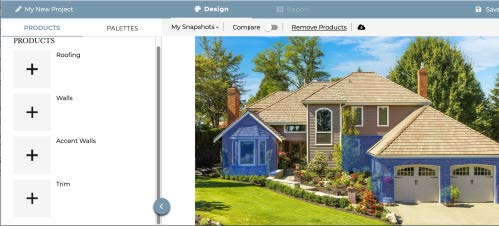
You’ll notice that when you hover over each option, the corresponding area on the image is highlighted in blue. This makes it easy to see exactly where the Color Visualizer will place the material on the home.
- Roofing: When you select Roofing, you’ll see two available options: Slate or Shake Roofing. Choose one of them, and the available colors will be displayed below fo
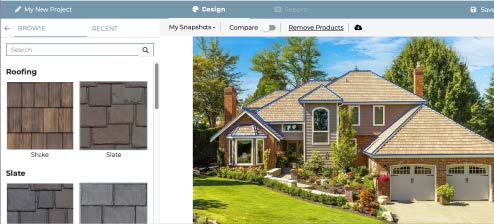 r you to add to the photo. Click your favorite!
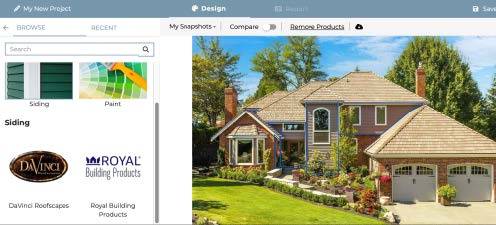
 - Walls and accent walls: Next, you’ll pick the walls for your home. The Color Visualizer includes paint colors and siding materials. The software automatically divides the facade of the home into sections called Walls and Accent Walls. You can choose the same siding color for the entire home or cover the Accent Walls in a different color or material to add interest and increase curb appeal.
Note: On homes with complex architecture, the Color Visualizer may divide the image into several sections of Wall and Accent Wall. Follow the blue highlighting to see where each selection will be applied.
- If you choose Paint, you’ll be able to pick colors from either Benjamin Moore or Sherwin-Williams. If you have a favorite paint color just type the name or number into the search bar and the Color Visualizer will pull it up for you.
- When you select Siding, you’ll see two options: a) DaVinci Roofscapes for Hand Split Shake Siding; b) Westlake Royal Building Products for Horizontal Plank, Shingles or Vertical Board & Batten siding
- Trim: After you’ve added your siding, choose Trim at the bottom of the menu to pick a complementary paint color for the trim.
If you’re not happy with the result, simply click the Browse arrow on the left side of your screen to return to the product selection menu. From here, you can reselect any product and tweak your design until you find a combination you love.
3 - Save and download your designs
Saving your designs is easy. At the top of the page look for “Create an Account.” Creating an account lets you save and download all your designs. They’ll also be stored online so you can return later and keep on designing.
When you save an image it’s a good idea to include a few details about the products in the project name. For example, using a name like “Province Slate Roof and Essential Gray Walls” will help you organize and compare your ideas.
How to use exterior color palettes
The Color Visualizer also includes pre-set color palettes with roofing, siding and trim colors that work beautifully together. These palettes reflect the latest trends and may be used as-is or tweaked with your own color selections.
Color palettes change all the exterior finishes on an image instantly. They’re a quick, easy way to experiment with dramatic changes in a home’s appearance. Plus, they’ve been selected by expert designers, so you know they’ll give your home a great new look.
To use a color palette, simply access the menu by clicking the word “Palettes” at the top of the page. Choose a color combination and the Color Visualizer will automatically apply the color palette to your image. For details about the products in a color palette, just click Products at the left. If you’d like, you can edit the individual products in the palette to create a unique design.
Make a custom exterior color palette
To create a custom color palette, you’ll individually select the roofing, siding and trim from the Product list. This takes a bit more time, but you can choose a look that’s perfect for your unique home.
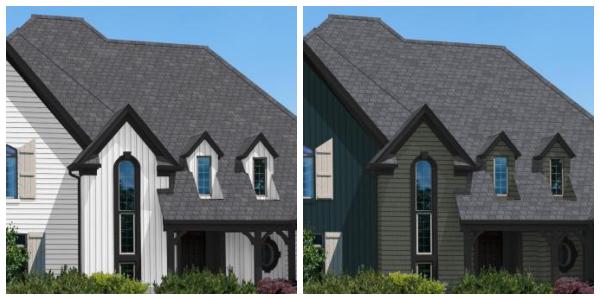
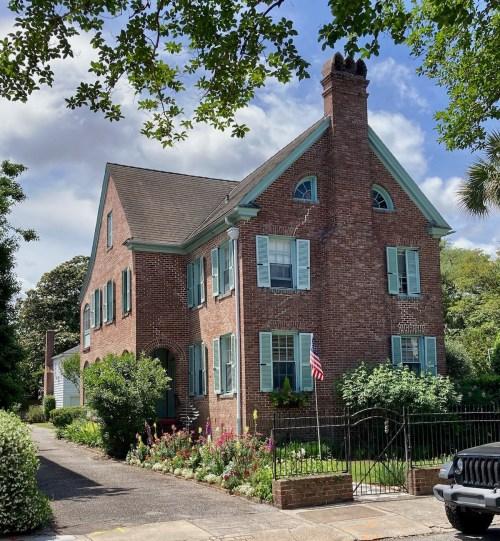
For example, I wanted to see how this historic home in Charleston, South Carolina would look with painted brick and a new roof. First, I uploaded a photo:
Next, I chose Sherwin-Williams paint in the color Sea Salt for all the brick areas. This neutral shade works beautifully with the classic blue-green trim and shutters. To enhance the home’s historic character, I chose DaVinci Single-Width Slate roofing in Brownstone. Here is the result:
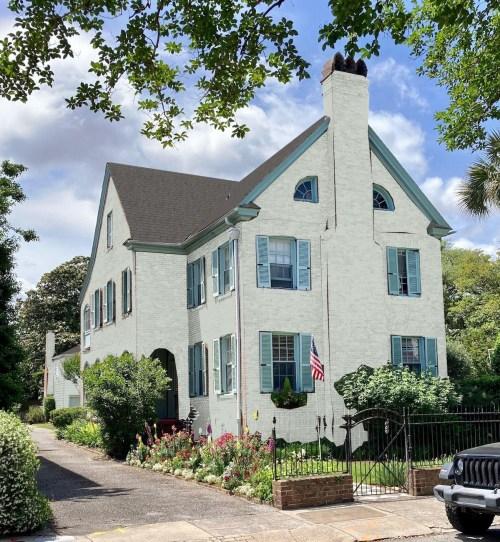
A custom exterior palette gives you complete control over the product selections so you can choose finishes that align perfectly with your home’s architectural style.
Once I’ve created the first image, it only took a few seconds to try out a different roofing material. Here’s how the home looks with DaVinci Multi-Width Shake Roofing in Weathered Gray:

Color visualizer tips and tricks
Working with the Color Visualizer is easy, but there are a few tips you should know before you begin. Making changes to an image is faster and easier if you use the DaVinci sample images. However, they may not have an image that resembles your home, so uploading your own photo can be a big help.
When you upload a photo, the software may not read every detail perfectly. It overlays your color selections on top of the image so there may be small gaps.
Also, the software automatically divides the surfaces of the home into separate sections.
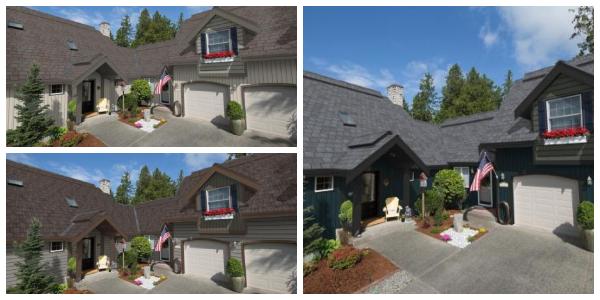
If you upload a photo of a home with complex architecture, the software will divide the walls into many sections. It will name the sections Wall 1, Wall 2, and so on. (Look for the blue highlighting to see where a color will be a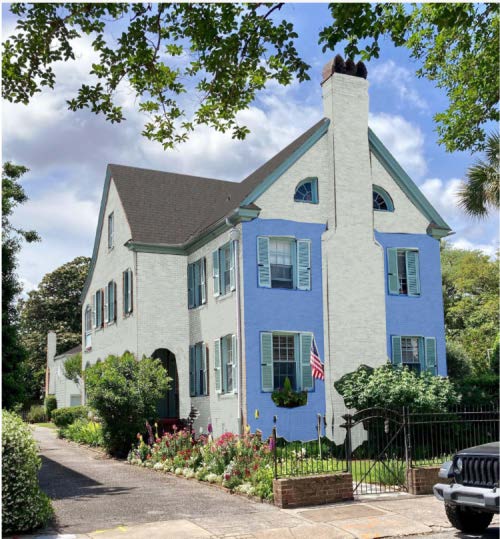 pplied.) Creating a custom image takes more time because you’ll need to select the color for several wall sections.
The Color Visualizer divided the facade of this home into eight sections, and I chose Sea Salt for each one. Here you can see the blue highlighting that indicates the front section, and a few small gaps around the edges. Overall, I think the Color Visualizer does a great job with uploaded photos.
Renovating your home’s exterior is a big project and it’s important to make the right decisions. If your home is looking dated, a creative color scheme can make it look like a brand new home. With the Color Visualizer you can see exactly how your home will look and avoid making costly mistakes.
Learn more about choosing exterior colors on the DaVinci blog. Please visit:
- Understanding Paint Color Undertone
- Your Home is Telling You the Best Colors to Use. Are You Listening?
- How to Choose Exterior Colors
Learn more about DaVinci Roofscapes here.
Have a question? AskARoofer.
Find your local roofing contractor in the RoofersCoffeeShop® Contractor Directory.
Recommended For You

DaVinci® Roofscapes Launches New Cost-effective Province™ Slate
Read More ...
Armourshake™ Now a Class 4 Shingle
Read More ...
Chimney Tuckpointing: Do’s and Don’ts for Selecting Mortar
Read More ...")

")


Comments
Leave a Reply
Have an account? Login to leave a comment!
Sign In